We are bombarded with many different artificial scents all day long. Cleaning and personal hygiene products, air fresheners, candles, bathroom sprays, they all have scents that can be harmful to the human body. They cause problems that can go from allergies and asthma to cancer and birth defects.
"It is estimated that 95% of the synthetic fragrances on the market today are derived from petroleum by-products. Trademarked scent is protected by the law as a "trade secret". These types of protected fragrances are not required to list the concoction of chemicals on the product label. They are only required to list the term "fragrance"." - Natural News
I know that we are all suckers for a different delicious smell, but there are many ways you can surround yourself with all, or at least mostly, natural scents.
Store bought wax melts are usually made of paraffin wax and scented with artificial fragrances, neither are the things you want burn in your house.
A great alternative is spending 20 minutes making your own wax melts.
My favorite recipe also happens to be insect repellent.
Melt the wax in glass jar inside a pot of water, when it is totally melted add the Andiroba and the essential oils.
I strip my tea candles and use the metal cup as molds (you will need 5 for this recipe), pour the mixture very carefully into each one, after they are cold and hardened I take them out and put the candles back in! No waste!!
You can use an entire piece or cut them in half or quarters.
EDIT: Oh well... Just read this and it makes sense:
"Interestingly, essential oils are not safe options for candle fragrances, either. A soy or beeswax candle scented with essential oils will release toxins, since combustion changes the molecular structure of these oils."
I saw a recipe on a French site a few weeks ago that asked for "black cocoa butter", that got me curious, I called my people in Brazil and they said there was no such a thing. After little research, I found it on Ebay (what can't you find there?), but when it finally reached me, I realized it isn't cocoa butter, it was what we call in Brazil "cacao mass", raw cacao, what is left behind after removing the butter.
I wasn't sure how that would work on a skin product, but I am happy to say, the results were very nice. It spreads nicely, the skin looks and smells wonderful, I do not recommend it for hair, as it is a bit too thick. Here is my Brazilian version of the French recipe.
Melt the Cupuacu Butter in a double boiler over low heat heat. Mix the oils in. Separate it into two equal parts and transfer them into two different containers. In one of the two containers, add the cocoa butter cut in very small pieces and heat if necessary to melt. Let cool a bit and then put the two preparations in the freezer for a few minutes. Take them out and mix them well again, you can use an electrical mixer. Put back in the freezer.Transfer both butters into a container keeping them separate.
I did mix mine to a whipped butter consistency. For that you definitely need a electrical mixer.
The dark butter will be slightly harder because of the cacao. Use that side for body and the other for neck and face.
Essential Oil - 5 to 10 drops, depending on essential oil and your taste.
Melt the butter Murumuru in a double boiler over low heat, after is melted mix it with the Brazil Nut Oil VERY well. Then mix essential oil. Transfer to a small bottle.
USE: This serum can be used to control frizz and fix your curls in the go. It also reduces dryness, protects your hair from the elements, and chemical treatments.
If necessary, you can heat your oil by dipping the bottle in a hot stream of water just before application. Shake well before use.
This amazing butter nourishes the driest skin, gives it an instant glow and prolongs your tan. It can be used before sun exposure and to bring some extra glow to your Summer skin. It does not replace sunscreen for prolonged exposure.
INGREDIENTS Tucuma Butter- 2 oz. Buriti Oil - 0.5 oz. Cupuacu Butter - 1.5 oz. Mica Pigment bronze or brown - as much as you want, depending on how dark you want to go. optional - Vitamin E (for longer shelf life) - 8 drops
Melt Tucuma and Cupuacu using a double boiler, when melted add Buriti oil. Put in fridge, when it starts to solidify add the other ingredients mixing well to form a smooth even colored paste. Transfer to your container and let it finish cooling down either in room temperature or fridge. It may stain light fabrics.
There are many ways to make scrubs, and thousands of "ready to use" on the market. A scrub is a great way to get rid of dead skin cells, therefore helping with uneven, bumpy, flaky or dry skin. Scrubbing is also a great way to massage your legs, helping the circulation which helps with cellulite, tired legs and even spider veins.
For a made at home body scrub I like to keep it simple: oil + sugar.
For the oil you can actually use even kitchen oil, but the experience won't be the same as if you splurge a bit. A lot of people use coconut oil, it works well. But my favorite is Passion Fruit Oil.
3 Reasons Passion Fruit is my favorite for scrubs:
It has a nice fruity scent without being overpowering.
It spreads out nicely, and it is just oily enough for a good few minutes of scrubbing.
It is light enough to be kept on your skin, no soap, just rinse off the sugar.
Mix 1 part oil for 2 parts sugar. I usually just mix what I am using that same day, but you can make a jar and keep it in a cool, dark place, or the fridge, a good cold scrub during the hot Summer days feels heavenly!
Shave first if you need, if your skin gets too thin or sensitive after shaving then wait one day.
You need to sit in order to do a good scrub, I usually sit on my little deck outside, if you have a bathtub put a towel on the edge and sit your cute behind down, for a shower bring a little stool. But a stand up, rushed scrubbing is no good!!!
Put a little bit of the sugar on your hands and work your legs up and down with both hands, use some pressure, don't overdo it to the point of getting raw skin, but massage your legs like you mean it!
I usually get all tingly after my scrubbing sessions, it is the circulation being worked.
Do the same for your arms, butt, and shoulders. Be a bit more delicate on chest and neck area. If you are lucky enough to have someone handy to help you with your back do it!
You can find my Passion Oil, or like we call it in Brazil: "Maracuja Oil" HERE.
Ojon Oil comes from a palm tree that grows naturally from the Caribbean to the north of Brazil, in the Amazon Rainforest. Ojon is a trademark name and got famous by the popular hair product line by the same name, this oil has many names like Caiue, Americanoil and Dende-Bravo in Brazil, and Batana in Honduras.
It is a heavy oil, rich in unsaturated fatty acids, best used for chemically treated, damaged or dry hair. It can be added to your shampoo, conditioner and masks, can be used pure as a hot treatment (do not overdo it, 3 times a week should be plenty, then down to once a week) and after washing to protect against the heat abuse of styling. It should be used before the beach or pool, just wet your hair, apply a little bit of the oil mostly at the ends, and then braid it, wetting your hair before the ocean and pool prevents it from "drinking up" salty or chlorine water.
In Brazil, where girls are still straightning their hair like crazy, some hair salons offer an Ojon Mask after the procedure or even mix the oil with the chemicals (which some specialists say will prevent damage but will also prevent the chemicals to work at full potential.)
A "hardening agent" is that one (or more) ingredient you use in your recipe to make your lotion bars and lip products solid.
Remember to always adjust your formulas if switching from Beeswax to a vegan recipe. The higher the melting point the less you need to add.
Ucuuba and Japanese Wax are not hard enough to be the only hardening agents for lotion bars and tube lip products, but they work just fine for balms, salves and scrubs.
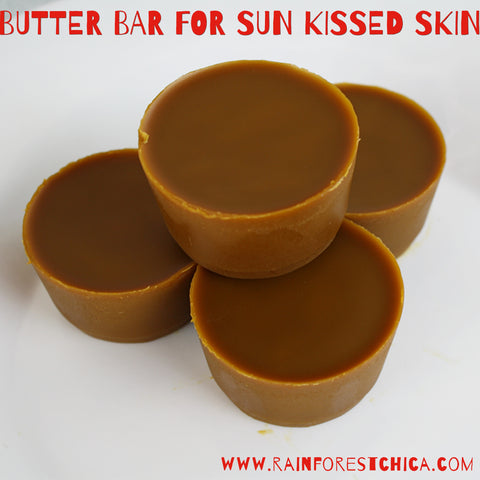
This Butter Bar is full of beta-carotene and has healing, moisturizing and calming properties. Perfect for before and after the sun. Apply to tanned legs to show them off in your Summer outfits. Leave it in the fridge for an extra relief when you do too much sun.
"Lotion Bar" or, a "Butter Bar", is a mix of your favorite butters and oils made harder (higher melting point) by a wax.
The end result is a solid bar that you apply on your skin much like a surfer puts wax on her board
Advantages of a Lotion Bar: no liquid oil mess, no having to melt butter in your hands before applying, super easy to apply, added advantages of Beeswax, fun to make!
Disadvantages of a Lotion Bar: it will melt under high heat making a HUGE mess if you don't have it in a container, if you do, then it will be impossible to get it out of container without melting it again, the beeswax may feel a little heavy on your skin, finding the perfect recipe may be a bit like making a cake without proper measure of ingredients.
Yep, I am still in favor.
You will need:
Medium sized pan
Very clean glass jar with lid.
Waxed paper cups for molds (I use the 5 oz. cups).
A clean rag or kitchen towel.
Ingredients (for Two just under 3 oz. bars or TWO 1.25 oz. bars, I like making mine smaller)
Bacuri Butter 1.5 oz.
Murumuru Butter 1.5 oz.
Buriti Oil 1 oz.
Beeswax (organic raw is my favorite) 1 oz.
How to Make: Melt wax first, after it is all melted add butters and then after the mix is liquid add oil, check if the oil have hardened the wax, if it does melt for a bit longer, if not take out of the heat.
JAR WILL BE HOT! Dry the jar well so o water gets in your bar and pour melted contents intoyour mold. Bars should be hard in no time, if you live in a hot place pop them in the fridge for a few minutes.
You will need a little container to take them around, if you are using them at home, you can keep them in the cup, keep one in the bathroom and one in the fridge.
DO NOT LET IT MELT IN YOUR CAR OR PURSE, BIG MESS!